


Hello, readers! Today I’m going to talk to you about one of the coolest things you can learn in knitting or crocheting: the Fair Isle technique! Fair Isle “print” has recently been making a huge resurgence back into modern fashion design and culture. (It’s that snowflake pattern typically seen on sweaters and hats.) But why? Where did this pattern come from and why do we love it so much? I’ll answer that question and a whole lot more in this blog post!
Let’s start with a brief history lesson. Fair Isle is an island north of Scotland and is part of the Shetland Islands. The tiny island is known for 2 main things: an awesome bird observatory and their traditional style of knitting. I’m obviously not here to tell you about the birds, so let’s talk about the knitting technique.
Fair Isle knitting is traditionally done in the round, so it’s fairly common to see on items like socks, hats and sweaters. The work is always multicolored and there is usually no more than 3 or 4 consecutive stitches in the same color. The main idea is to build patterns out of alternating colors in the stitches. Below you can see an example of this in knitting on the left and crochet on the right:
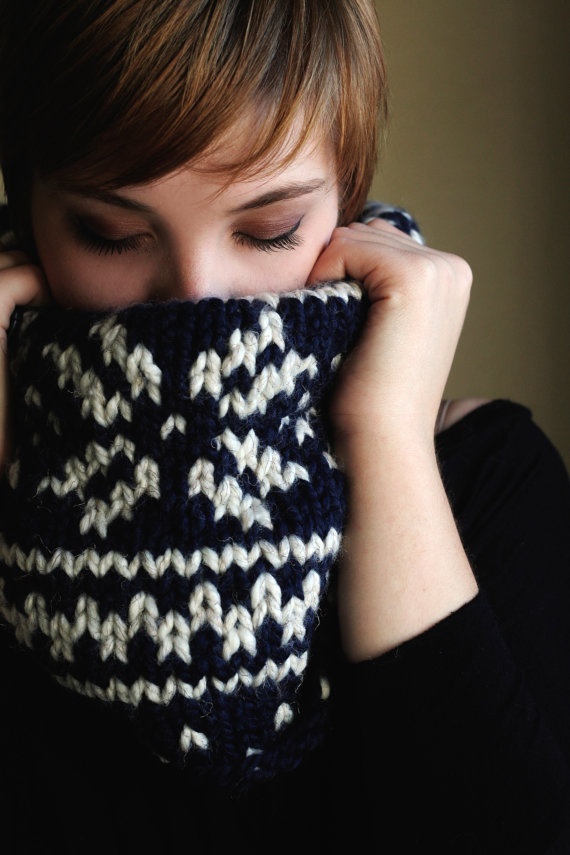
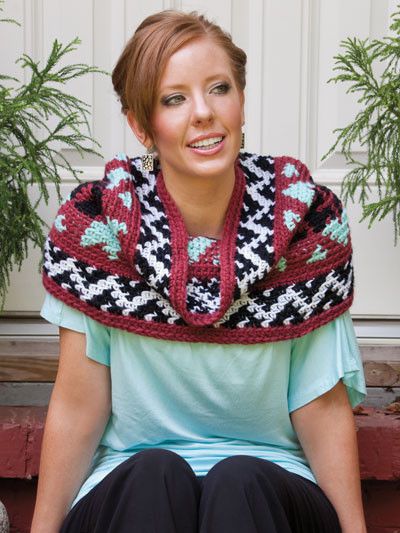
Crochet is not the traditional method and doesn’t have quite the same effect. If you look at the image on the left (knit), you see that the pattern is made of little “V’s” or arrows that are oriented vertically. The stitches form very straight vertical lines, but the horizontal rows are a little jagged from the points of the stitches. This makes the patterns for the Fair Isle technique appear clean and crisp because they’re stacked right on top of one another in a straight line. On the other hand, if you look at the image on the right (crochet), you can still see a pattern but it’s a bit more jagged and slanted. This is because the faux “stockinette” stitch that’s used in crochet builds the little “V’s” sideways. If you look closely, you can see that the rows not only have the sideways arrow, but the post of the crochet stitch is showing as well. This causes the effect of the “slanted” pattern throughout the piece.
While both ways are correct, knitting is the traditional and preferred method. This doesn’t mean that crochet doesn’t work though! There are a number of methods to create this effect through crochet that are decently effective. I’ve compiled a series of methods and stitches that could help with achieving this style through crochet instead of knit.
Method #1: Half-Double Crochet Stitch
The first method I’m going to cover is done with a standard crochet stitch: the Half-Double Crochet (hdc). The half-double crochet stitch is special because it gives you an extra loop to work in on the back of the work. If you complete a row of any crochet stitch you will see that the top view has those little “V’s” I was referring to. You want to obtain this look on the front of the work. With the half-double crochet stitch, you can “roll” the V to the front and reveal the other loop on the back to work in. By building from this loop you put the post of the stitch behind the row of V’s. Unfortunately, this only works to obtain the knit look if you work in a round. If you work in straight lines and turn at the end of each row, you’re only going to have the “knitting” look every other row.
1. Chain 10 and connect into a loop
2. Row 1:
- Chain 2
- Yarn Over and insert the hook into the next chain
- Pull a loop through the chain, (you should have 3 loops on your hook now)
- Yarn over and pull through all 3 loops at once (one hdc complete)
- Repeat in the rest of the 9 chains
- Join to beginning with a slip stitch
3. Row 2:
- Chain 2
- In the second stitch from the hook (hdc) in the loop on the back of your work
- Repeat for the rest of the row in the back loops of the work
- Join to beginning with a slip stitch
4. Repeat Row 2 until desired length
As you can see, you have a “knit” pattern, but the stitches are sideways. This is good for building quick knit style projects in the round, but it gets a little weird looking if you try it in straight rows.
Method #2: Waistcoat Stitch
The next method I’m going to go over is the Waistcoat Stitch. This stitch is a little complex and I haven’t mastered it yet myself, but it creates a very nice effect. I’ve had a hard time finding any proper tutorials for this stitch, and I’m thinking it might be because it’s not a standard stitch. This is the best example out there that I’ve found, and really helps demonstrate the method.
Basically all you do is work with single crochet (sc) stitches and work each row into the posts of the last row’s stitches. This can make the process very time consuming, as only half of the already small single crochet stitch is building up the work. However, it creates the vertical V shape we’re looking for for the knit style. Unfortunately, this one can also only be worked in a round. You can work it in rows, but you will have to cut the yarn at the end of each row and reattach for the next one.
Method #3: Tunisian Crochet
The final method I’m going to show you is called Tunisian Crochet. This method is very different from any other crochet technique I’ve ever done, but I find it very easy to pick up and maybe even a little faster than normal. Here is a good simple tutorial on how to crochet in this style. It’s basically like knitting without the other needle. You “cast on” the loops of your work onto the hook handle then work yarn back through the loops with the hook. There are methods for doing purl stitches as well, but in order to get the look for the Fair Isle patterns, I wanted to focus on the knit stitch.
This method is the best method to obtain the knit look because it pretty much is knitting. You build the little V shapes vertically just like it looks in knitting. This makes building Fair Isle patterns in crochet easy and they look nice too! The only disadvantage I’ve found to this method is that it cannot be worked in the round very easily. There are methods to working it in the round, like this one, but they are a little complex and I’m not sure how you would work color changes and patterns into it. (If you have any tips or tutorials on that, let me know!)
I’ve found this method to be best for making scarves and hats. The hats I’ve made with it will have a seam up the back, but it’s not too big of a deal in my eyes. I’ll just make the hat as a rectangle that’s big enough to wrap around my head, sew a seam up the back and cinch the top. These hats look great with a pom-pom on top so you can hide any messiness created by the cinching.
Working With Fair Isle Patterns
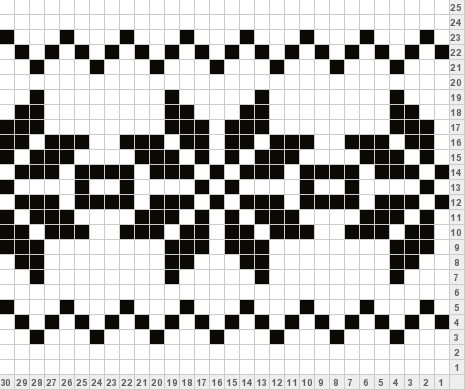
Fair Isle print patterns are pretty easy to work with and pick up on. I like to think of each stitch as a “pixel” in the picture. Once you see it this way, it’s pretty easy to catch on to the fact that pretty much any imagery can be translated into a Fair Isle pattern. Traditionally, the patterns you will use are geometric and repetitive. Rows of triangles, diamonds, pluses and arrows are very common and can be layered and combined in a variety of ways. Another very common motif is this snowflake pattern:
Work has to be done with at least 2 colors, but the possibilities are endless with what you can do! You could use monochromatic colors to create gradient effects within the patterns. Using a “pop” color in combination with neutrals can be eye catching and trendy. You could even use this technique to create images in your work like a Hello Kitty motif or Mario… The list goes on and on. Just be creative and see what you can come up with!
I want to end this with showing you some awesome examples of Fair Isle crochet and knit that I’ve found on the internet. Below you can see my mini gallery of images I’ve found in a multitude of places such as Pinterest, Tumblr and Google. You can easily apply the knit patterns to your crochet work and get the same effect using one of the methods I talked about before!
(This gallery is not my own images and if you see yours and don’t want it there, don’t hesitate to let me know! I apologize for any issues.)
If you’ve made any Fair Isle printed items or need some help starting your project, talk about it in the comments! I’d love to see your projects and offer any help that I can. Thanks for reading and don’t forget to share and spread the love!
