


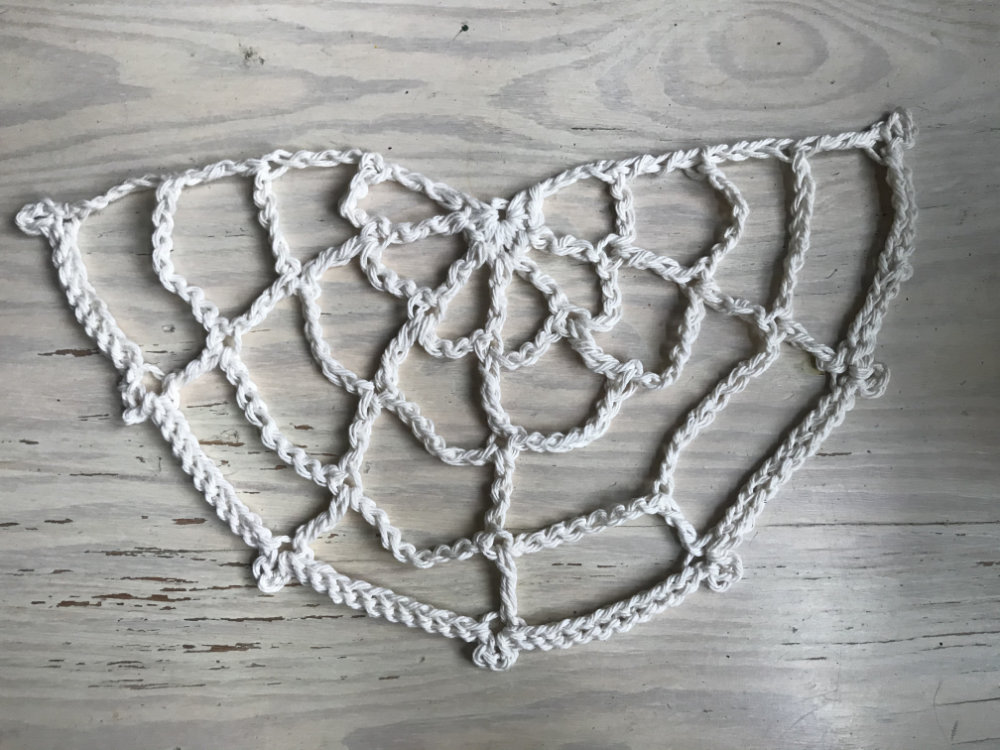
[vc_row][vc_column][vc_column_text]Just in time for Halloween, I’m going to show you today how to crochet some spooky spider webs!
Materials:
- I-9 (5.5mm) crochet hook
- 1 skein worsted weight cotton yarn
- Scissors
Stitches/Techniques Used:
-
Magic Loop
-
CH – chain
-
SC – single crochet
-
TC – triple crochet
-
SL – slip stitch
[/vc_column_text][vc_row_inner css=”.vc_custom_1571762473894{margin-top: 5px !important;margin-bottom: 5px !important;padding-right: 15px !important;padding-left: 15px !important;background-color: #f5f5f4 !important;}”][vc_column_inner width=”1/3″][vc_column_text]
SETUP ROW:
[/vc_column_text][/vc_column_inner][vc_column_inner width=”2/3″][vc_single_image image=”5373″ img_size=”full” alignment=”center”][vc_single_image image=”5374″ img_size=”full” alignment=”center”][/vc_column_inner][/vc_row_inner][vc_row_inner css=”.vc_custom_1571762524407{margin-top: 5px !important;margin-bottom: 5px !important;padding-right: 15px !important;padding-left: 15px !important;background-color: #f5f5f4 !important;}”][vc_column_inner width=”1/3″][vc_column_text]
ROW 1:
CH 4, turn work
[/vc_column_text][/vc_column_inner][vc_column_inner width=”2/3″][vc_single_image image=”5375″ img_size=”full” alignment=”center”][vc_single_image image=”5376″ img_size=”full” alignment=”center”][vc_single_image image=”5377″ img_size=”full” alignment=”center”][/vc_column_inner][/vc_row_inner][vc_row_inner css=”.vc_custom_1571762524407{margin-top: 5px !important;margin-bottom: 5px !important;padding-right: 15px !important;padding-left: 15px !important;background-color: #f5f5f4 !important;}”][vc_column_inner width=”1/3″][vc_column_text]
ROW 2:
[/vc_column_text][/vc_column_inner][vc_column_inner width=”2/3″][vc_single_image image=”5378″ img_size=”full” alignment=”center”][vc_single_image image=”5379″ img_size=”full” alignment=”center”][/vc_column_inner][/vc_row_inner][vc_row_inner css=”.vc_custom_1571762524407{margin-top: 5px !important;margin-bottom: 5px !important;padding-right: 15px !important;padding-left: 15px !important;background-color: #f5f5f4 !important;}”][vc_column_inner width=”1/3″][vc_column_text]
ROW 3:
[/vc_column_text][/vc_column_inner][vc_column_inner width=”2/3″][vc_single_image image=”5381″ img_size=”full” alignment=”center”][vc_single_image image=”5382″ img_size=”full” alignment=”center”][vc_single_image image=”5383″ img_size=”full” alignment=”center”][vc_single_image image=”5384″ img_size=”full” alignment=”center”][/vc_column_inner][/vc_row_inner][vc_row_inner css=”.vc_custom_1571763134908{margin-top: 5px !important;padding-right: 15px !important;padding-left: 15px !important;background-color: #f5f5f4 !important;}”][vc_column_inner width=”1/3″][vc_column_text]
ROW 4:
[/vc_column_text][/vc_column_inner][vc_column_inner width=”2/3″][vc_single_image image=”5385″ img_size=”full” alignment=”center”][vc_single_image image=”5386″ img_size=”full” alignment=”center”][vc_single_image image=”5387″ img_size=”full” alignment=”center”][vc_single_image image=”5388″ img_size=”full” alignment=”center”][/vc_column_inner][/vc_row_inner][vc_column_text css=”.vc_custom_1571763202901{padding-top: 20px !important;}”]
-
Start each new round with CH 4. This counts as a TC stitch.
-
The chains between the TCs increase by 2 each new round.
-
To add a gap, chain the number of stitches, chain one more, then chain the same number of stitches. Skip on TC and TC in the next one.
[/vc_column_text][vc_row_inner css=”.vc_custom_1571763127574{margin-top: 5px !important;padding-right: 15px !important;padding-left: 15px !important;background-color: #f5f5f4 !important;}”][vc_column_inner width=”1/3″][vc_column_text]
FINISHING ROW:
[/vc_column_text][/vc_column_inner][vc_column_inner width=”2/3″][vc_single_image image=”5389″ img_size=”full” alignment=”center”][vc_single_image image=”5390″ img_size=”full” alignment=”center”][/vc_column_inner][/vc_row_inner][vc_column_text css=”.vc_custom_1571763213765{padding-top: 20px !important;padding-bottom: 20px !important;}”]
[/vc_column_text][vc_column_text]
Check out the video tutorial below for more details about the pattern:
[/vc_column_text][vc_video link=”https://youtu.be/NduO4pbjBqg” align=”center”][/vc_column][/vc_row]
