


[vc_row][vc_column][vc_column_text]Hello, friends! I’d like to start this post off with a quick apology. I didn’t expect to have taken such a long time between these 2 posts, but life kind of got in my way… Anyways, after months of having my skater dress cut out from part 1 of my Skater Dress Tutorial, I’ve finally found the time to sit down and get it all sewn together. Now I’m ready to share the experience with you guys!
If you haven’t already, please go see Part 1 of this tutorial so you can catch up! This post starts at step 3 as a continuation of the first post.
What you need for this part of the project:
- About 1 – 2 yards of stretch knit fabric, depending on your dress size
- Coordinating thread
- Straight pins
- A sewing machine with straight and (optional) zig-zag stitches
- The pattern you made from part 1!
Step 3: Cutting Out the Fabric Pieces
Unfortunately, due to getting a new phone during this process, I don’t have photos of this step. I hope you can bear with me and follow my graphics just as well!
3a. Bodice
[/vc_column_text][/vc_column][/vc_row][vc_row][vc_column width=”1/2″][vc_column_text]First you’re going to cut out the bodice piece. This one is super easy so it’s a good starting place. Lay out your fabric and fold it perpendicular to the stretch of the fabric.[/vc_column_text][/vc_column][vc_column width=”1/2″][vc_single_image image=”1828″ img_size=”full” alignment=”center”][/vc_column][/vc_row][vc_row][vc_column width=”1/2″][vc_column_text]Next place the bodice pattern along the fold of the fabric. Trace around the pattern.[/vc_column_text][/vc_column][vc_column width=”1/2″][vc_single_image image=”1831″ img_size=”full” alignment=”center”][/vc_column][/vc_row][vc_row][vc_column width=”1/2″][vc_column_text]Remove the pattern piece from the fabric. Before I cut folded pieces, I like to pin each corner through both layers of fabric so that they stay even while I cut. (Of course, this is optional.) Cut along the line you traced leaving the fold intact. Unfold the fabric, and voila! Repeat one more time so you have 2 bodice pieces.[/vc_column_text][/vc_column][vc_column width=”1/2″][vc_single_image image=”1834″ img_size=”full” alignment=”center”][/vc_column][/vc_row][vc_row][vc_column width=”1/2″][vc_column_text]
3b. Sleeves
Lay out the fabric like you did before so that you can lay the pattern along the fold. Place your sleeve pattern on the fold like shown below.[/vc_column_text][/vc_column][vc_column width=”1/2″][vc_single_image image=”1837″ img_size=”full” alignment=”center”][/vc_column][/vc_row][vc_row][vc_column width=”1/2″][vc_column_text]Trace around your sleeve pattern the same as you did for the bodice and cut it out, leaving the fold intact.
Repeat step 3b for another sleeve and set them aside.[/vc_column_text][/vc_column][vc_column width=”1/2″][vc_single_image image=”1840″ img_size=”full” alignment=”center”][/vc_column][/vc_row][vc_row][vc_column][vc_column_text]
3c. Skirt
Remember when we were drafting the pattern for the skirt we drew it as a quarter? This is where you will be thankful for that. Using the quarter pattern allows you to work with seemingly less fabric at once. In reality, the fabric is just folded out of the way, but it’s very helpful none the less.
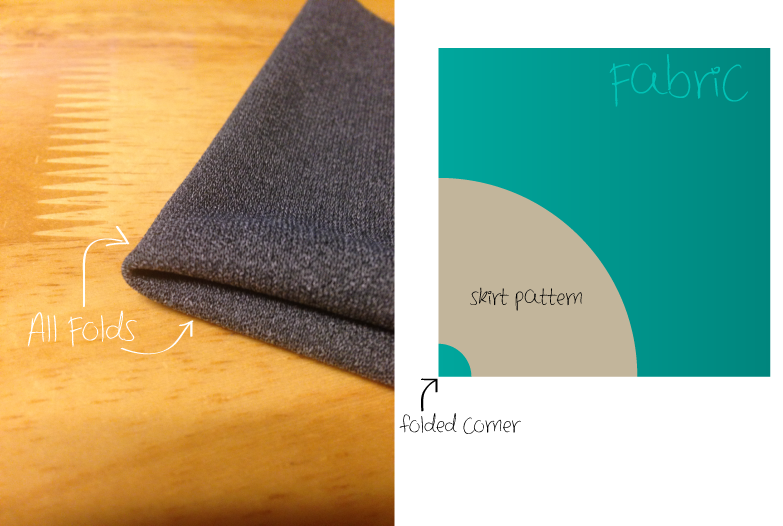
Start by folding the fabric in half, then in half again like the picture shows below.
Your fabric will of course be bigger and not already cut into a circle. This was just a scrap I used to demonstrate the fold.
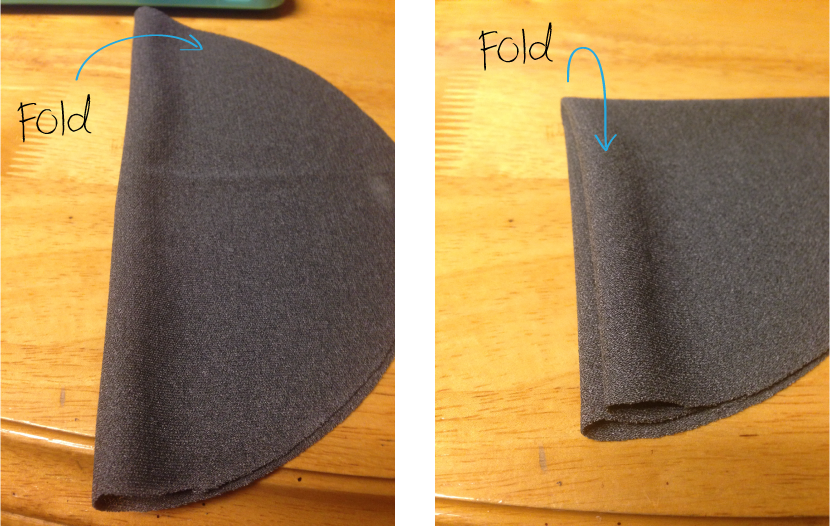
Find the corner that has no raw edges. It should all be folded edges of the fabric. Place your skirt pattern on this corner so that the waist is around the corner.
 [/vc_column_text][/vc_column][/vc_row][vc_row][vc_column width=”1/2″][vc_column_text]Similar to what I did for the bodice, I like to pin the fabric down for this part before I even start tracing. You’re working on top of 4 layers of fabric so it’s easy for them to slip and slide around. Pin along both straight edges as shown below, then trace the curve of the hem of the skirt.[/vc_column_text][/vc_column][vc_column width=”1/2″][vc_single_image image=”1849″ img_size=”full” alignment=”center”][/vc_column][/vc_row][vc_row][vc_column][vc_column_text]Cut along both of the curves and you’re done. Open up the fabric and you should have a circle skirt! It should look like a big doughnut (a circle with a circle cut out of the middle).
Step 4: Pinning The Pieces
This is where the fun begins in sewing, at least in my opinion. I find it very satisfying to have a bunch of cut out fabric pieces ready to be morphed into a 3-dimensional object that I can wear. So, pinning them together is the start of the fun for me! 🙂
4a. Bodice
I’m going to start with the bodice. This is probably the easiest part to work with. Lay your 2 bodice pieces on top of each other, right sides facing in. It may be hard to figure out which side is the right side of some plain fabrics. In my case, I had a dark grey solid knit fabric that looked the same on both sides. Upon closer inspection, I noticed that the one side was solid grey while the other was grey with white threads showing through. I assumed this was the wrong side of the fabric because it looked a little messy compared to the other side. Not sure if I’m right, but if it looks fine then who cares? Am I right?[/vc_column_text][/vc_column][/vc_row][vc_row][vc_column width=”1/2″][vc_column_text]Pin your bodice along the side seams, making sure to line up the corners of the sleeve hole and the waist.
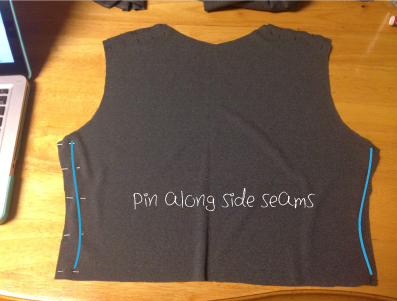 [/vc_column_text][/vc_column][vc_column width=”1/2″][vc_column_text]Next, pin the shoulder seams together.
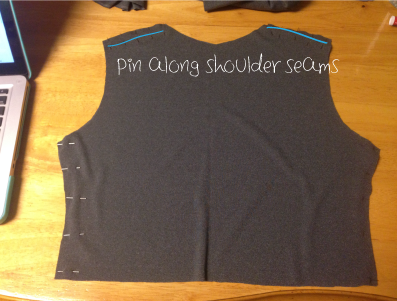 [/vc_column_text][/vc_column][/vc_row][vc_row][vc_column][vc_column_text]If you’re pieces aren’t perfectly matched up along the arms or neckline, don’t freak out! This is normal for free handed patterns and doesn’t cause much trouble once you hem everything.
4b. Sleeves
[/vc_column_text][/vc_column][/vc_row][vc_row][vc_column width=”1/2″][vc_column_text]This is super simple: just fold your sleeve piece in half length wise with the right side of the fabric on the inside of the “fabric taco”. Then line up your corners and pin only along the straight side like the picture here:[/vc_column_text][/vc_column][vc_column width=”1/2″][vc_single_image image=”1904″ img_size=”full” alignment=”center”][/vc_column][/vc_row][vc_row][vc_column][vc_column_text]You don’t need to do any pinning to the skirt because it’s already one piece! You can, however, hem the darn thing at this point if you’d like. Some people might find it easier to pin the hem while there’s less fabric attached to the other side of it. Personally, I like to do my hems after the garment is complete because I can more accurately gauge how it will look in the end.
Step 5: Initial Construction & Sewing
5a. Seams
The first part you need to sew is the seams. This is the easiest part of the sewing and is best to do all in one swoop. Start with your side seams on the bodice. I used a half inch seam allowance, only because I felt that my pattern was cut a little big. If you have a serger, I strongly suggest using it now. Knits are an untamed beast in the sewing world that cause many beginners trouble and heartbreak. If you’re using a regular sewing machine, you need to be very careful about your thread tension and how fast you feed the fabric through your machine. Stretching the fabric too much or having tight thread tension can cause unsightly puckering because the fabric will bounce back over the stitch. A couple quick fixes to this are:
Option 1. Use a zig-zag stitch.
If your machine has stitch variations, pick the zig-zag option (double zig-zag, if you have it!). This will cause the fabric to be pulled more horizontally through the machine rather that vertically. The horizontal movement keeps the knit from being stretched and extended. I opted for this option for the inner seams because I have a really nice layered zig-zag stitch on my sewing machine that I wanted to try out.
Option 2. Buy a double needle.
A double needle will run 2 perfectly parallel seams along your garment as you sew. This will help make seams look professional and clean like the hems you see on tshirts! Using this to finish your dress hems will give it that tshirt look on the sleeves and skirt. Please note that not all sewing machines are capable of running a double needle! You need a second thread spool on the top of your machine so you can run 2 seams simultaneously.
Tip: Since knits are stretched a lot during day-to-day wear, I think it’s important to double up every seam on the garment. While this isn’t a requirement, I find that it helps make my homemade garments more durable and sturdy.[/vc_column_text][/vc_column][/vc_row][vc_row][vc_column width=”1/2″][vc_column_text]Anyways, let’s get started on the dress. As I said before, start with your bodice. Run a seam up both sides making sure to follow the curved shape of the sides closely.[/vc_column_text][/vc_column][vc_column width=”1/2″][vc_single_image image=”1906″ img_size=”full” alignment=”center”][/vc_column][/vc_row][vc_row][vc_column width=”1/2″][vc_column_text]Next run 2 seams across the shoulders. Theses are quick and straight, so they shouldn’t cause you any trouble at all. I did not use a zig-zag stitch on my shoulder seams.[/vc_column_text][/vc_column][vc_column width=”1/2″][vc_single_image image=”1912″ img_size=”full” alignment=”center”][/vc_column][/vc_row][vc_row][vc_column width=”1/2″][vc_column_text]Finally, sew the seams along the sleeves. At this point, it may be a good idea to try on the sleeves to make sure they’re not too tight. Sleeves are one of the hardest parts of this construction, so if you have to take them off after the whole thing is done it can be a real pain![/vc_column_text][/vc_column][vc_column width=”1/2″][vc_single_image image=”1909″ img_size=”full” alignment=”center”][/vc_column][/vc_row][vc_row][vc_column][vc_column_text]
5b. Attaching the Bodice to the Skirt
[/vc_column_text][/vc_column][/vc_row][vc_row][vc_column width=”1/2″][vc_column_text]Now that your basic seams are done, move on to attaching all of the pieces. Honestly, both of theses are equally tricky so I’m just going to start with the skirt.
You need to work with the right sides of the fabric facing each other again, just like you did for the initial seams. The best way I can explain this is you need to put your bodice upside down into the skirt. Flip the bodice right side out (seams in), and the skirt inside out (wrong side of fabric should be on the outside).
Turn the bodice upside down and stick it into the skirt through the waist. Since there isn’t really a “front” to the skirt, it doesn’t matter how you attach it. It should just be one big symmetrical circle.
Start by pinning the seams evenly around the skirt waist. Pin the middle of the front and back of the bodice to the skirt, then the middle of the sides. It should be a “plus” shape when you’re done.
Fill in with pins around the whole waist until the whole thing is secure.
To sew this part, it’s a lot easier if you have a machine with a removable section under the needle. This allows for the dress to be slipped over the machine and worked without bunching or folding your work awkwardly.[/vc_column_text][/vc_column][vc_column width=”1/2″][vc_single_image image=”1915″ img_size=”full” alignment=”center”][/vc_column][/vc_row][vc_row][vc_column width=”1/2″][vc_column_text]Sew a seam along the waist at the same seam allowance as before. Once you’re done, remove your pins and turn the dress right side out. Pat yourself on the back because that was one of the most time consuming parts of this project!
This part of the dress will be stretched A LOT so it might be a good idea to run back over this seam a second time. I also opted for a zig-zag stitch here simply because it provides extra room for stretching. If you’re feeling fancy, you could always add a strip of elastic to the waist to make it even more stretchy. I’m not quite that ambitious…[/vc_column_text][/vc_column][vc_column width=”1/2″][vc_single_image image=”1918″ img_size=”full” alignment=”center”][vc_single_image image=”1921″ img_size=”full” alignment=”center”][/vc_column][/vc_row][vc_row][vc_column][vc_column_text]
5c. Adding the Sleeves
Don’t give up yet, you’re almost done! This is the other pretty tricky part of this project, so don”t be discouraged if you mess up a little. That’s what seam rippers are for!
You’re going to attach the sleeves the same way you did the bodice to the skirt. The bodice (it’s the whole dress at this point) should be inside out and the sleeves right side out. Slip your sleeve down into the bodice through the armhole.[/vc_column_text][/vc_column][/vc_row][vc_row][vc_column width=”1/2″][vc_column_text]Pin at the seam first. Line up the seam of the sleeve to the side seam of the bodice. As you can see in the photo, I pin my seams flat on either side. This keeps the excess flaps from the seams from getting twisted and puckered while sewing.[/vc_column_text][/vc_column][vc_column width=”1/2″][vc_single_image image=”1924″ img_size=”full” alignment=”center”][/vc_column][/vc_row][vc_row][vc_column width=”1/2″][vc_column_text]Next, find the center of the sleeve directly across from that and pin it to the shoulder seam. Pin the rest of the sleeve evenly the whole way around the sleeve hole.
Sew around the circle.
Repeat this for the other sleeve and flip it right side out. You’re now done with attaching all of the pieces![/vc_column_text][/vc_column][vc_column width=”1/2″][vc_single_image image=”1927″ img_size=”full” alignment=”center”][/vc_column][/vc_row][vc_row][vc_column][vc_column_text]
Step 6: Finishing and Hemming
The final step to this dress is finishing the collar, sleeve cuffs, and skirt hem. This part is tricky simply because you have to be neat and clean with your stitches. These stitches will be visible on the garment while you’re wearing it, so be sure to coordinate the thread and go slow.
6a. The Collar
All you’re doing here is folding the seam allowance of your collar back into the dress. Flip it inside out and fold back your seam allowance. I only did 1/4 inch because I like the look of the thin collar seam. Pin the fabric down and make sure that the seam allowance is even around the whole collar.[/vc_column_text][/vc_column][/vc_row][vc_row][vc_column width=”1/2″][vc_column_text]Sew around the collar carefully, making sure to keep your seams straight and even. Remove your pins.
(Sorry, I forgot to take pictures of this process! If you have any questions, please send me a message.)[/vc_column_text][/vc_column][vc_column width=”1/2″][vc_single_image image=”1963″ img_size=”full” alignment=”center”][/vc_column][/vc_row][vc_row][vc_column][vc_column_text]
6b. Skirt Hem
If you didn’t do this before, then it’s time to do the #1 most time consuming part of sewing a dress… The skirt hem. Hemming takes a lot of time and patience, but you will be so happy with the results! Garments that are hemmed look more neat, plus they hold up longer. If you don’t hem your raw edges, you might end up with fraying, unraveling, or even tearing fabric!
There are a number of different ways you can hem a garment, but I’m just going to go over a basic rolled hem. Again, this all relates back to the tshirt look I wanted with my dress.[/vc_column_text][/vc_column][/vc_row][vc_row][vc_column width=”1/2″][vc_column_text]First, heat up an iron. Ironing your folds before you sew will make a world of difference in making clean, professional looking clothes. Fold your fabric at the bottom of the skirt up a half inch the whole way around, ironing it down as you go. If this seems too big of a hem, you can do a quarter inch instead. A half inch can be much easier to work with if you’re new to sewing.
I also used my hem as a way to shorten the skirt of my dress. My skirt was way too long, so I made a big hem to reduce the length.[/vc_column_text][/vc_column][vc_column width=”1/2″][vc_single_image image=”1930″ img_size=”full” alignment=”center”][/vc_column][/vc_row][vc_row][vc_column width=”1/2″][vc_column_text]Once you’ve gone the whole way around the skirt once, repeat the same thing! Fold your fabric back another half inch and iron it down. Just press, pin, repeat the whole way around the skirt.[/vc_column_text][/vc_column][vc_column width=”1/2″][vc_single_image image=”1932″ img_size=”full” alignment=”center”][/vc_column][/vc_row][vc_row][vc_column width=”1/2″][vc_column_text]Now that your hem is all folded and pinned, go ahead and sew your seam. I run my hems right along my presser foot so that I’m sure they’re straight and even.
Voila! You have a lovely hemmed dress! Now let’s finish it all up…[/vc_column_text][/vc_column][vc_column width=”1/2″][vc_single_image image=”1935″ img_size=”full” alignment=”center”][/vc_column][/vc_row][vc_row][vc_column width=”1/2″][vc_column_text]
6c. Sleeve Cuffs
I saved this part for last because it’s very easy. It’s always nice to be able to end a project on a simple task and I feel it relieves some stress! The sleeve cuffs are literally just folded back and sewn straight. It’s kind of like the skirt hem, but with less pinning and shorter seams. You can do a rolled hem here if you’d like, but it’s not required.
With the dress inside out, fold your sleeves back to the desired cuff width and pin in place.. I like big cuffs, so I folded mine back 1 inch.[/vc_column_text][/vc_column][vc_column width=”1/2″][vc_single_image image=”1938″ img_size=”full” alignment=”center”][/vc_column][/vc_row][vc_row][vc_column width=”1/2″][vc_column_text]Sew along the seams, carefully like you did for the collar, and you’re done! That’s it![/vc_column_text][/vc_column][vc_column width=”1/2″][vc_single_image image=”1966″ img_size=”full” alignment=”center”][/vc_column][/vc_row][vc_row][vc_column][vc_column_text]Action Shots:
Here is my finished dress! (Ignore my distressed hair/face, I was up really late working on this…)[/vc_column_text][/vc_column][/vc_row][vc_row][vc_column width=”1/2″][vc_single_image image=”1941″ img_size=”full” alignment=”center”][/vc_column][vc_column width=”1/2″][vc_single_image image=”1944″ img_size=”full” alignment=”center”][/vc_column][/vc_row][vc_row][vc_column][vc_column_text]
Other Things to Consider:
Skater dresses are extremely versatile. Starting with this basic pattern it’s really easy to develop all kinds of dresses, from special occasion to unique casual pieces. Have fun with patterns and prints to create unique, one-of-a-kind pieces for your wardrobe! I’d love to see what you guys make using this pattern and eventually be able to create a gallery of dresses made with it! If you’ve followed this pattern and made a skater dress, please link to it in a comment below or email it to me from my contact page.
Thanks for reading, and come back soon!
Looking for Part 1? It’s right here!
[/vc_column_text][/vc_column][/vc_row]
